Guest Post- DARLING SPRING WREATH!
Hi I’m Sierra from Blue Robin Cottage! I am so honored to share my tutorial with you on
Craft-O-Maniac!! Thank you so much for this opportunity Jen!! 🙂
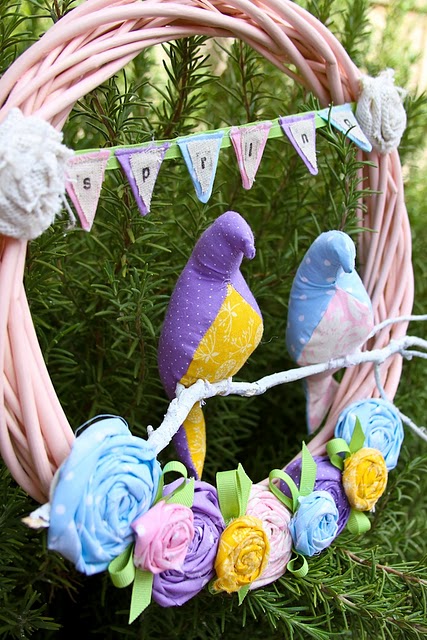
I am so ready for spring! Move over St. Patricks day, bring on Easter! And what better way to get the holiday rolling than with one of these…

So when guests come to your door, they know you are all about the spring season! 🙂 I totally used what I had on hand so the project only cost me $1
Here’s What You’ll need for this fun spring wreath:
*Ribbon
*A wreath of some sorts- I found mine at the dollar store
*Fabric- for the rosettes and mini bunting
*Mini stamp set with black ink pad
*Polyfil- for your birdies
*A tree branch
*Hot glue gun
*Spray paint (if you are painting your wreath
*One small triangle template and one even smaller triangle template for your mini bunting
First you will need to make your little birdies from the pattern link above. They are so cute! I am totally inspired to make a mobile for my daughter’s room with them!


Have you ever gone to the dollar store with something in mind that you wanted and came out with something way better? This definitely happened to me yesterday when I went to the Dollar Tree looking for a styrofoam wreath and came out with this wicker wreath. Way cooler don’t you think? This is what mine looked like before:

After: with a little spray paint…

You don’t have to paint your wreath, I just had some extra pink spray paint on hand so I thought I would give it a go.
Find a cute little branch in your backyard. I actually used mine from a Valentine’s day tree I made. Attach with hot glue.

To make the mini bunting across the top:

Step 1: Trace your triangle template onto your fabric with an invisible ink pen
Step 2: Sew around your triangle, leaving the top open
Step 3: cut out your triangles
Step 4: turn inside out with a small stick (I used the end of a tiny paint brush
Step 5: Take smaller triangle template and trace on lighter fabric (so that you can see the stamped letters)
Step 6: Cut out smaller triangles
Step 7: Using your mini stamp set and ink pad, stamp out the letters for “spring”
Step 8: Glue letter triangles onto the bigger triangles with your hot glue gun
Step 9: Sew triangles onto a piece of ribbon long enough to attach to the top of your wreath
Next you will want to arrange your fabric flowers onto your wreath and glue. You also need to attach your mini bunting at the top:

Then attach your birds onto the branch by hot gluing them first and then sewing them on with embroidery thread nice and tight.
And now you have a beautiful spring wreath…


I’m pretty happy with how it turned out!
Happy Crafting!
XOXOXO!

IS THAT NOT ONE OF THE CUTEST SPRING WREATHS EVER? THANKS SIERRA FOR SHARING IT WITH ALL OF US! jen
I definately live in the wrong country. We don’t have cute wreaths like that in our £1 shop, shucks. Still i love what you did. Seems to me there are so many wonderful wreaths out there and until a year or so ago i would certainly not have thought about inventing one for anything other than Christmas 🙂
That is adorable, I am following Sierra now,,, thanks for sharing this talented lady with us!!
Have a wonderful day Jen!
Come say hi sometime!! Bella Before and After , and if you want to win an Avocado Painting, come enter myGIVEAWAY HERE, I really appreciate the support.
Hugs,
Bella 🙂
This is so pretty! Although I don’t sew so I might make the rosettes and “spring” sign out of paper and try to buy some birds somewhere…… thanks for the inspiration!
Wow, this is adorable!!! Great job!
rhonda 🙂
I love this wreath – way tooo cute!!! Thanks for sharing and I am now following Sierra!
I think this is the cutest wreath I have ever seen.. lol Love it!
Thank you again for featuring me Jen!! I am so grateful for this opportunity!! 🙂
XOXOXO!!
Sierra
This is adorable! I made one sort of similar before even seeing this post.(It’s got the spring bunting and rosettes.) Great minds, eh!
Adorable! I made some of those great birds also! Thanks for sharing! I love your spring colors!
SOOO cute!
That is just perfect for eatsre with the little birds- what a lovely idea!! And the colours are just lovely.Thanks for sharing, I love wreaths, and make tons of them on my blog , hahaha, you can’t have too many wreaths!!!
I was finally able to give my wreath a try – I linked back to you as my beautiful inspiration – thanks again!
http://erraticallyelizabeth.blogspot.com/2011/04/spring-wreath-my-1st-wreath.html