Getting Organized-DIY- Earring & Necklace Holder
Reading and seeing this post, you all may see why I got the nickname “JenGlamGirl” and why I made my email jenglamgirl@gmail.com winks.
So my jewelry collection has been everywhere, all over the bathroom counter, in small boxes on the bathroom counter, in bathroom drawers, on my craft table, and just some of it in the jewelry box. I did not want to humiliate myself with the mess and chaos and share before pictures, so please just take my word for it. It was truly a giant mess of jewelry. My poor poor hubby, he is so patient with me.
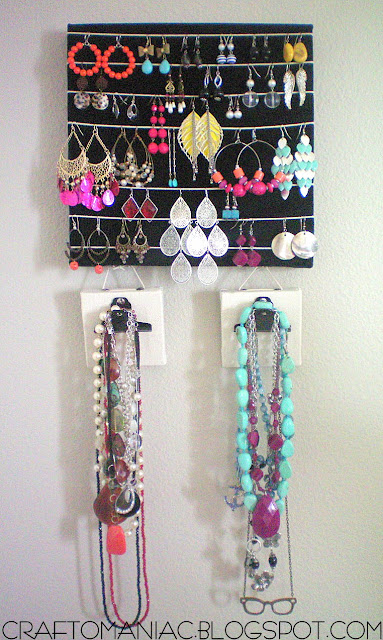
Well on this New Years Trek to “Getting Organized” … I got busy. Everything I used for the Earring and necklace holder, besides the thumb tacks, were from my wonderful sponsor Canvas Corp.
I used a chunky velvet 12×12 canvas board
cream colored poly cotton string
two large black metal clips
two small canvas corp boards
and small silver thumb tacks.
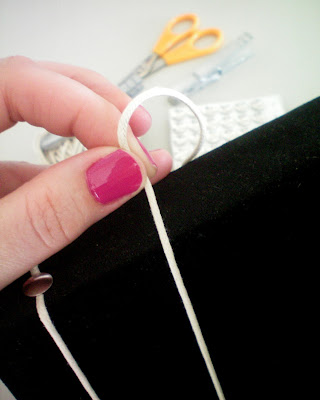
I pulled the string real tight, overlapping it over the side of the canvas board, and then pushed in the thumb tacks. They were real hard to push in, and aren’t going anywhere. Which is very good.
my favorite earrings! Ahhhhh’ aren’t they purdy? They are always my go to pair if I don’t know what else to wear with an outfit. I got them at TJ Max almost a year ago, they are so light I don’t even know I am wearing them. They are sterling silver, so they should last a long time, which is the best.


Oh, I’m loving this…you have inspired me. The bracelets on the vases….BRILLIANT!
I love it all! 🙂 Genius idea about the ice tray!! 🙂
some great ideas Jen! I love the rose water vases for your bracelets! I never know where to put mine. Thanks for sharing!!
I love this. Like you my jewelry is EVERYWHERE. I need to do something like this with mine.
Also- I have major jewelry envy!
http://threeloudkids.com
What a great idea. As it turns out today i organised my jewellery because a dear friend bought me a beautiful golden beaded lush box. Like you i have bits here, bits there, on the dressing table, in the bathroom cabinet. I didn’t reduce anything bar a small Avon box but atleast when i clean the dressing table i can give my new box pride of place. May still consider making one of yours though. Happy New Year 🙂
Ummm, I love this..I will probably duplicate…my ears aren’t pierced (don’t ask) and I was just thinking the other day that I needed a way to put them on something and this just might work…I’m currently working on my closet organizer and might have to incorporate this somewhere….thanks and great job…love the nail polish!
Fabulous ideas, I am always trying to find ways to showcase my jewelry, thank you:)
Ya know? I like this idea, because right now I’m using an earring holder, that I made from a picture frame; but I don’t like how I awkwardly have to fumble around with it for some earrings, reaching around the back, or having to just take the whole darn thing down, to grab just one pair. Dressing up is supposed to be fun. It is NOT supposed to test my level of patience first thing in the morning! I like that everything is right up front and center on this one! Easy access!.. Sooooo, I just may try this! Thanks for sharing how Jen! ~tina
This is darling! My favorite part is your bracelets on the vases! You have got some seriously cute pieces of jewelry girl! 🙂
Love all of these! and your jewelry is so pretty to look at!! pinning this now 🙂
Love how you organize your jewelry, especially with the vases and ice cube trays.
Love the ice cube tray idea. I love accessories-they ALWAYS fit!
I became a fan on facebook and follower. 🙂 Love your blog! Erin
Look at all that glorious bling! I’m sure you will be able to wear things more easily, now that you can see everything all at once. Great idea!
Love these ideas! I was just looking in disgust at my jewelry drawer this morning at the disorganization & chaos! You have saved my jewelry drawer! Found you from Tater tots & Jello! Heidi Rew from Partiesforpennies.blogspot.com
Just popped over from tatertots and jello, and wanted to say HI! I am just starting to spread my artsy fartsy wings-I have trouble finding the time…I can’t wait to check out more of your blog 🙂
So um LOVE your earring hanger!! Want one! But really… your collection… to die for!! Thanks for sharing 😛 xo
I love all these ideas. A jewelry box ever cuts it for me and I like seeing my jewelry choices. Thanks for the inspiration.
love these ideas! and your earrings are so cute, totally the kind i love too:)
I love your earring board – much nicer than the plastic rack I have at home! One idea is that you can put a dot of superglue under the head of the tack if you can’t push it all the way to the hilt. For my bracelets I painted wooden bead rack from when my daughter was a toddler, but I’m going to try the vase idea too!